간단하게 오리엔테이션과 자기소개를 진행하고 바로 크롤링 수업에 들어갔다.
크롤링을 하기 위해선 html 구조를 간단히라도 알아야하는데
<div> 구조를 담기 위한 태그
</div>
<ul> 목록
<li> </li> // 리스트
</ul> // 반복되는 값을 담기위한 태그
<a href:"url"> // 페이지 이동을 위한 태그 url 값이 있다.
href:"~" = 속성 atribute 이동을 하는건 a 태그의 기능이고 안에 들어있는 텍스트를 추출하려면 기사제목</a>
텍스트로 기사제목 을 추출하고 상세주소는 속성값을 가져와야함
크롤링 주제는
네이버 언론사별 랭킹뉴스 크롤링 및 데이터 시각화
우선 코랩에 접속하여 파일을 만들고 목차에 담아 코딩을 진행하였다.
파이썬은 많이 다뤄봤지만 코랩에서 쓰는것은 처음이여서 초반에 많이 헤맸다..
하지만 옆자리 동기가 잘알려주어서 극복
첫번째로 패키지 준비하기

코랩에는 이미 많은 패키지가 설치되어 있지만 데이터 크롤링에 필요한 여러 패키지를 pip 명령어를 통해 설치해주었다.
konlpy는 파이썬에서 한글 자연어 처리를 위한 패키지
사실 크롤링에 필요한 패키지는 아니고 한글 데이터 시각화를 위한 패키지 인것같다.
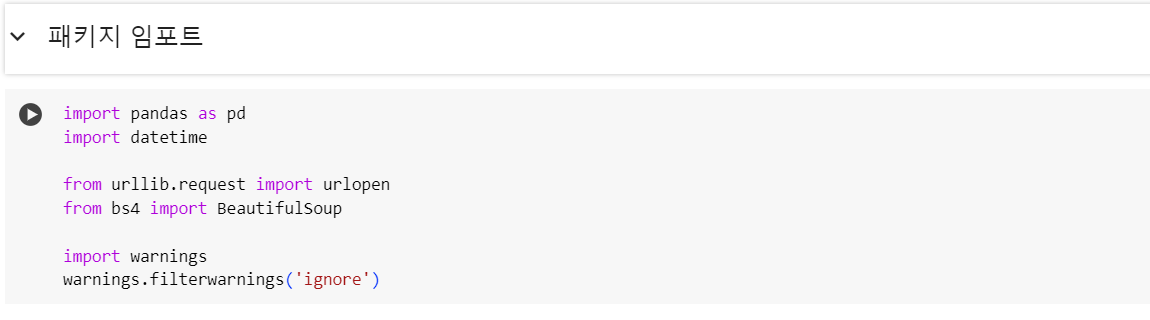
그뒤로 데이터 수집을 위한 라이브러리에서 필요한것들을 import해온다.
pandas 기초
[Python]Pandas basic 파이썬 판다스 기초 : 행,열 생성 및 수정하기
지난 포스팅에서는 DataFrame에서 행과 열을 삭제하는 방법에 대해서 소개해보았습니다. DataFrame에서 행 또는 열을 삭제할 때는 drop 함수를 주로 사용했고, drop 함수를 사용하면서 여러 옵션에 대해
seoyuun22.tistory.com
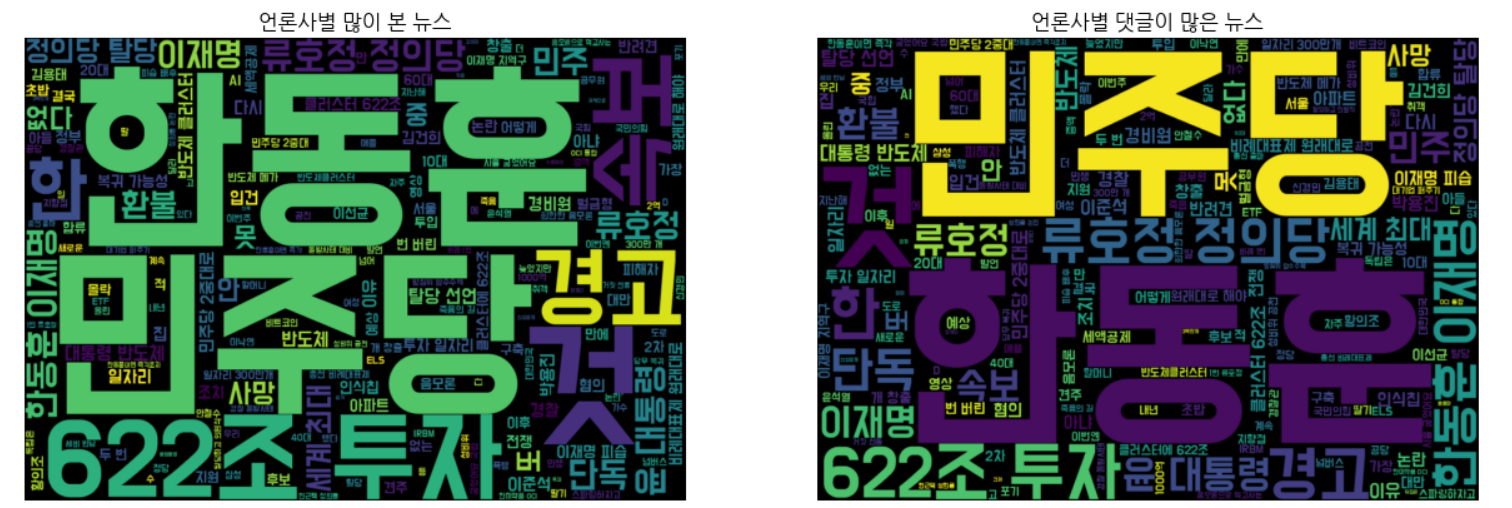
2.네이버 언론사별 랭킹뉴스-많이 본 뉴스 크롤링
3.크롤링한 데이터 저장하기
데이터를 표시하기 위함
인코딩이 안깨지기 위함
4.크롤링 데이터 시각화
워드클라우드를 위한 전처리
워드클라우드

5.많이본 뉴스 VS 댓글이 많은 뉴스 비교하기
댓글이 많은 뉴스 크롤링
워드클라우드를 위한 전처리
워드 클라우드

많이본 뉴스 VS 댓글이 많은 뉴스 비교하기
동적 크롤링을 하기위한 준비
동적 크롤링을 하는 이유는 화면 자체가 동적으로 구현되기 때문이다. (사용자가 보는 시점 부터 랜더링이 실행)
동적 웹사이트에서 정적인 방식으로 크롤링하는것은 단편적인 정보밬에 얻지 못함.
하지만 정적크롤링이 가능하면 정적크롤링으로 하는것이 좋다. 동적크롤링은 시간이 많이 걸리기 때문.
1. 크롬 버전부터 맞춰준다.
로컬C // programfile(x86) // google // chrome 경로로 들어가서 자동 업데이트를 위한 .exe 파일을 .exe.back 파일로 변경해준다. >> 구버전으로 크롤링을 돌리기 위함
그 이후 원래 설치되어있는 크롬을 지운다음 크롬 google-chrome-114-0-5735-199 버전을 다운로드 받은 이후 윈도우에서 변경하시겠습니까 아니오를 눌러야 위에서 아까 바꿔준 파일이 안바뀌게된다.
2. 아나콘다 설치
여러 라이브러리들을 따로 설치할 필요 없이 한번에 패키지를 다운받기 위해 아나콘다를 설치해준다.
이후 spyder에서 코딩
pip install selenium
pip install webdriver-manager
pip install beautifulsoup4
pip install wordcloud
consol에서 한줄씩 설치
from selenium import webdriver
from webdriver_manager.chrome import ChromeDriverManager
from seleniuhttp://m.webdriver.chrome.service import Service as ChromeService
from seleniuhttp://m.webdriver.common.by import By
from bs4 import BeautifulSoup
import time
import pandas as pd
import warnings
warnings.filterwarnings('ignore')
pip 가 잘안되어있거나
split 오류가 나는경우 spyder를 관리자 권한으로 실행 or 네비게이터 종료후 다시실행
# 크롬 브라우저를 열때 크롬 설정을 활용하는 과정, 개발자모드는 굳이 킬필요가 없다.
유튜브 댓글 크롤링
# 1) 크롬 옵션 설정
options = webdriver.ChromeOptions()
options.add_argument("--no-sandbox")
options.add_argument("--disable-dev-shm-usage")
# 내가 갖고있는 크롬의 버전과 브라우저를 열 수 있는 드라이버 버전을 설치하는 코드
# 상위버전에서 안되면 다운그레이드 필수
# 2) 크롬 브라우저 실행
service = ChromeService(executable_path=ChromeDriverManager().install())
driver = webdriver.Chrome(service=service, options=options) #크롬 브라우저를 만드는 코드
driver.set_window_size(800,800) #크게 키울필요가 없음 브라우저가 켜져있어야 크롤링이 가능하기 때문
#댓글을 확인하는것이기 때문에 800 800 모바일 버전으로 봐도 상관없지만 만약 pc버전에만 뜨는 정보를 얻으려면 가로축을 늘려주면 된다. 세로축은 상관없음.
# 3) 유튜브 영상 크롤링 https://youtu.be/Ww9FVHIWolk?si=Hs97QwRRTDycvazn
driver.get('https://youtu.be/Ww9FVHIWolk?si=Hs97QwRRTDycvazn')
# 유튜브에서 바로 url을 따오지 말고 공유를 누른다음 거기에 있는 url을 받아온다.
driver.implicitly_wait(10) #실시간 랜더링 사이트이기 때문에 정보가 뜰때까지 10초 기다려준다.
# 4) 사람인 척 하기
driver.execute_script('window.scrollTo(0, 800)')
time.sleep(10)
# 기계처럼 1초만에 다 내려버리면 아이피 주소가 차단당함(공격하는줄 알기 때문) 그걸 막기 위해서 들어가서 10초동안 보는척 코드 -> 페이지가 랜더링 될때까지 기다리는 이유도 있음
# 5) 댓글 수집을 위한 스크롤 내리기
last_height = driver.execute_script('return document.documentElement.scrollHeight')
# document = 페이지 , 지금 보고있는 스크롤의 세로 길이를 리턴
while True:
print('스크롤 중...')
driver.execute_script('window.scrollTo(0, document.documentElement.scrollHeight);')
time.sleep(3)
new_height = driver.execute_script('return document.documentElement.scrollHeight')
if new_height == last_height: #기존 세로 높이랑 내렸을때 높이랑 같다면
break #빠져나옴
last_height = new_height #아니라면 기존 세로 높이 최신화
time.sleep(3)
# 5-2) 답글 버튼 클릭 id=more-replies 버튼 클릭
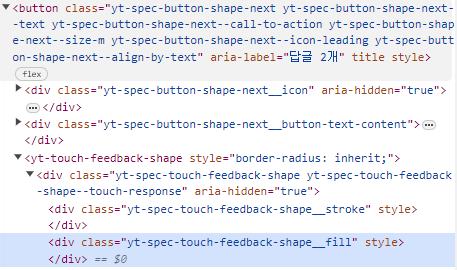
time.sleep(1.5)
buttons = driver.find_elements(By.CSS_SELECTOR, '#more-replies')
for button in buttons:
driver.execute_script('arguments[0].click();', button) #script는 액션, arrgument는 버튼
print('답글 버튼 클릭...')
# 5-3) 페이지를 처음부터 끝까지 스크롤 순회 (답글 수집하지 않으면 5-2, 5-3은 생략가능)
h_new_height = new_height/5
for scroll in range(0, new_height, int(h_new_height)):
driver.execute_script("window.scrollTo("+str(scroll)+","+str(scroll*2)+");")
time.sleep(3)
# 6) 댓글 크롤링
time.sleep(5)
html_source = driver.page_source #페이지 소스를 받아옴
soup = BeautifulSoup(html_source, 'html.parser') #파싱 시작
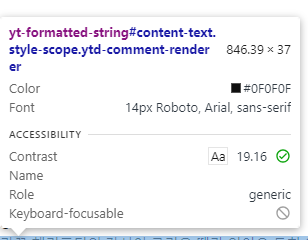
크롤링하고자하는 속성을 알아야하기 때문에 다음을 보고 유추
아이디가 #content-text인 애들의 yt-formatted-string 값을 받아오고자함
attribute값을 가져오고싶다면 .attribute로 받아옴
comment_list = soup.select('yt-formatted-string#content-text') # 태그 포함
comment_final = []
for i in range(len(comment_list)):
temp_comment = comment_list[i].text
temp_comment = temp_comment.replace('\n', '').replace('\t', '').replace('\r','').strip() #엔터 탭 기타 공백들을 제거해주기 strip은 앞뒤 공백 제거 메서드 ->메서드 체이싱 원래 하나하나 다지워야하지만 한줄로 쓸수 있는걸 체이싱이라고 함
comment_final.append(temp_comment) #새로운 요소 추가 append
# 7) 데이터 프레임으로 만들기 csv로 만들고 싶어서
youtube_dic = {'댓글 내용' : comment_final}
youtube_df = pd.DataFrame(youtube_dic)
#이런 출력문을 잘써주는게 중요함 끝났는지 알수있기 위해
print('==' * 30)
print('크롤링종료...')
print('==' * 30)
# 8) 수집된 데이터 확인
print(youtube_df.info())
# 9) 크롤링 데이터 저장하기 (.csv)
youtube_df.to_csv('유튜브_댓글_크롤링_20240115.csv', encoding='utf-8-sig', index=False)
# encoding='utf-8-sig 해야 한글이 안깨짐
print('==' * 30)
print('파일 저장 완료...')
# 10) 크롬 브라우저 닫기
driver.close()
!!답글도 같이 크롤링하려면 딱 한번만 눌러야함
구글 버전때문에 오류가 발생하는 경우 경로를 수동으로 설정해 줘야한다 크롬이 설치되는 위치가 다다르고 어제 했던 업데이트를 막아놔도 C:\Users\euclidsoft_edu\AppData\Local\Google\Chrome 이경로에 다시 설치되는경우도 있음
C:\Program Files (x86)\Google\Update 보통은 이경로에 있음
https://chromedriver.storage.googleapis.com/index.html?path=114.0.5735.90/ 여기서 드라이버를 깔아준뒤 경로를 드라이버 위치로 설정해줌
#service = ChromeService(executable_path='C:/Users/euclid_edu/chromedriver.exe')
driver = webdriver.Chrome(service=service, options=options)
이미지 수집을 위한 동적 크롤링
from selenium import webdriver
from webdriver_manager.chrome import ChromeDriverManager
from seleniuhttp://m.webdriver.chrome.service import Service as ChromeService
from seleniuhttp://m.webdriver.common.keys import Keys
from seleniuhttp://m.webdriver.common.by import By
import time
import os
import urllib.request
# 폴더 생성 함수 (저장되는 위치를 설정해주기 위함)
def createFolder(directory):
try: #권한에 걸리는 리소스에 걸리는 활동인 경우에는 무조건 예외처리를 해줘야함
if not os.path.exists(directory): #폴더가 있으면 안만들고 없으면 만들기 위한 작업
os.makedirs(directory)
except OSError:
print('Error Creating directory. ', + directory)
# 1. 키워드 입력 및 폴더 생성
keyword = '꽃'
createFolder('./'+keyword+'_img_download') #현재 있는 위치로 경로를 이동시킨 다음에
print('1. 키워드 설정 및 폴더 생성...')
# 크롬 브라우저 준비
options = webdriver.ChromeOptions()
options.add_argument("--no-sandbox")
options.add_argument("--disable-dev-shm-usage")
service = ChromeService(executable_path=ChromeDriverManager().install())
driver = webdriver.Chrome(service=service, options=options)
time.sleep(3)
# 2. 키워드 검색
print('2. 키워드 검색', keyword)
driver.get('https://www.google.co.kr/imghp?hl=ko')
keywords = driver.find_element(By.NAME, 'q')
keywords.send_keys(keyword)
# 입력된 값 전송
keywords.send_keys(Keys.RETURN)
# 3. 스크롤 내리기
print('3. 스크롤 중 .............'+ keyword)
SCROLL_PAUSE_TIME = 1
# Get scroll height
last_height = driver.execute_script("return document.body.scrollHeight")
while True:
# Scroll down to bottom
driver.execute_script("window.scrollTo(0, document.body.scrollHeight);")
# Wait to load page
time.sleep(SCROLL_PAUSE_TIME)
# Calculate new scroll height and compare with last scroll height
new_height = driver.execute_script("return document.body.scrollHeight")
if new_height == last_height:
time.sleep(SCROLL_PAUSE_TIME)
try:
# 더보기 버튼
print('더보기 버튼 클릭.....')
# my34qd -> mye4qd -> LZ4I 크롤링을 막기위해서 더보기 버튼의 클래스명을 수시로 바꾸기 때문에 항상 확인해야됨
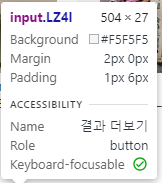
driver.find_element(By.CSS_SELECTOR, ".LZ4I").click()
except:
break
last_height = new_height
# 4. 이미지 검색 개수 확인 및 다운로드
links=[]
images = driver.find_elements(By.CSS_SELECTOR, "img.rg_i.Q4LuWd")
print('4. 이미지 검색 개수 확인.....')
for image in images:
if image.get_attribute('src')!=None:
links.append(image.get_attribute('src'))
print(keyword+' 찾은 이미지 개수:',len(links))
time.sleep(2)
print('5. 이미지 다운로드 시작.....') #링크를 먼저 수집해 준뒤 다운로드를 해줌
for k,i in enumerate(links):
url = i
start = time.time()
urllib.request.urlretrieve(url, "./"+keyword+"_img_download/"+keyword+"_"+str(k)+".jpg")
print(str(k+1)+'/'+str(len(links))+' '+keyword+' 다운로드 중....... Download time : '+str(time.time() - start)[:5]+' 초')
print(keyword+' ---다운로드 완료---')
driver.close()
첫날이지만 많은 것을 배운거 같아 재밌었다.
손으로 코드를 받아 적기때문에 오타가 생겨 컴파일 오류가 생길경우 시간이 조금 부족한 감이 없지않아 있었지만 오늘은 나름 잘 따라간거 같다.
내일은 코딩하면서 테크노트에도 메모 해놓기! 저녁에 쓰는데도 뭔가 쓰고싶었던 내용이 기억이 안난다;;
'ABC 부트캠프' 카테고리의 다른 글
| ABC 부트캠프 day8 : 프로젝트 중간발표 (2) | 2024.01.24 |
|---|---|
| ABC 부트캠프 day5 : 초거대언어모델 & 생성형 AI 핸즈온 (0) | 2024.01.19 |
| ABC 부트캠프 day4 : 딥러닝 활용 (0) | 2024.01.18 |
| ABC 부트캠프 day3 : 딥러닝 기초 및 실습 (0) | 2024.01.17 |
| ABC 부트캠프 day2 : 머신러닝 딥러닝 기초 (0) | 2024.01.16 |


